This is the online version of the Basic Indoor Putting Green Installation Guide
Turf Warranty: Warranty MPG – TPN 10 yr
Model Specific Instructions PDF for Download: Please refer to diagram on your packing sheet.
You can download and print the PDF version of this Basic Guide here (Pro Trainer Model is in Basic Guide): PPS-Install-Instructions-Basic1
Parts:


Step One:
Remove all panels and components from boxes. *If your base system and turf was delivered in cold weather you should allow 4+ hours for the base panels and putting turf to condition in your warm indoor temperature. This will make the panels and turf easier to work with.
Step Two:
Carefully unroll your putting turf. Be sure not to cut the turf when removing from protective plastic.
The turf will lay completely flat after just a few hours.
Step Three:
Lay out your base panels in the shape of your putting green. Be sure to place the base panels where you intend to set up your putting green.

You will notice, there are screw holes in the panel system. Screws are only necessary in outdoor installations. Your base panels will fit and stay together without screws.
Step Four:
Begin by interlocking a few pieces of the base at one end.

Once you have a few pieces at one end interlocked, kneel on the assembled pieces and PULL the other pieces TIGHTLY into place.
Generally, pushing pieces into place will be far more difficult than pulling the panels into place.
NOTE: The Panels should be pulled together TIGHTLY, there should be absolutely no gaps between panels!
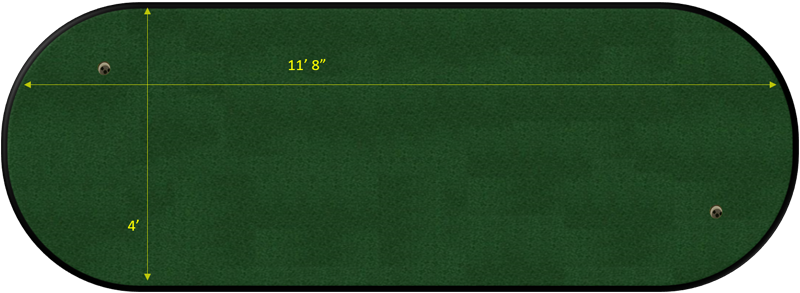
A 17.5′ ft putting green with 1/8th of an inch gap between each of the 9 panels will obviously result in the appearance that the turf is 1 and 1/8th inches too short. PLEASE be sure to assemble the panels TIGHTLY.

By kneeling and pulling you will also be less likely to scratch the floor where you are installing your putting green.
Step Five
Once you have the base panels pulled into place you can install your “Floating Cups”.


Note About Floating Cups, Curved Panels and Center Panels
The cups are designed to be held in place by your putting turf and they have approximately 1″ of “play” in every direction.
The beauty of the Floating Cup Design is the allowance for some expansion and contraction during temperature changes.
While the effects of expansion are rarely felt in smaller greens, larger greens will have subtle expansion and contraction, this is completely normal.
Floating Cups are located in “Single Curve Panels” and “Panel Center w Cup” pieces.
Most cups are located in corner pieces as shown below:


All rounded “Single Curve Panels” or “Corner Panels” come with a pre-cut hole, if your design does not call for a Cup, simply insert the “Filler Plate” in the same fashion you would insert the Floating Cup.
Larger greens and many custom greens have cups in Center Panels and Center Panels with cups should be carefully installed to be sure that the base panel is oriented in the proper position with the Floating Cup hole in the proper corner, see below:

As you can see the cup is off center and toward a corner. If your green has cups in center panels be sure to see the layout on the packing sheet that comes with the green. The layout sheet will show you exactly which direction the panel should be oriented properly, so that the turf will fit properly over the cup.
“Deck Washer”
 The floating cups come pre-packaged with a plastic doughnut shaped item called a “Deck Washer” and some small pieces of two sided adhesive.
The Deck Washer can be used to fill in the possible gap around the floating cup if necessary. Usually the roll of the ball is not affected by the small space around the floating cup but, the washer is included if necessary.
There are small tabs of tape that come packed inside the packaging for each cup assembly. These tabs are used to secure the deck washer to the top of the panel once inserted in the circular space.
Step Six
Place the turf into the assembled base panel system.
The turf should not fit too tightly into the base panel system, remember that there should be approximately 3/8ths of an inch gap ALL THE WAY around your pre-cut putting turf and the base panel bumper rail. This allowance is for expansion and contraction of the turf and the base panel pieces themselves.
You can use your putting green immediately if you wish however, please allow for 4-6 hours for the turf to lay completely flat.
Allow your putting turf to season for a few days in your environment. The turf is literally designed to bake in the hot sun for years. The more you use it, the softer the fibers will become and the better the green will play. Feel free to vacuum, sweep or brush your putting surface as often as you wish.
The turf was recently tightly rolled on a large spool weighing over 1,000 pounds, and it will take a few days for the turf to become accustomed to the new environment.
Step Seven
Align your “Floating Cups” with the pre-cut holes.

The floating cup allows for easy alignment of the lip around your cup and the pre-cut hole in the turf.
Step Eight
Assemble your pin designed for easy retrieval of your ball in the cup. Pro Putt Pins come with stickers already attached and you can ignore part #16 in the diagram below.

Adding Undulation to Your Putting Green
Undulations are only limited by your imagination. There are three customary ways to add undulations and contours to your green.
1. Between the turf and the base panels:
When adding undulation between the turf and the base panelsremember that only slight elevation is needed to create break. Typically something as simple as a couple pieces of thin cardboard cut into a rectangle shape approximately 4 inches wide and 12 inches long will work perfectly.

2. Underneath the base panels:
The best way we have found to inexpensively add fully customized, natural and rolling undulations is to purchase a 32″ x 48″ piece of 1/8th inch thick Wainscoting at your local Lowes or Home Depot store. The price should be around $11.
Place the Wainscoting underneath the base panels and slide any household item under the Wainscoting, magazines and books are effective.
This will allow you to customize the amount of break and maintain a smooth, natural and rolling break.
For larger greens you can use a 4′ x 8′ piece of Wainscoting but, maintain the thickness of 1/8th of an inch for best results.
3. Permanent installations using pre-fabricated contour system:
For installations that are designed to be permanent, you may want to consider purchasing our pre-fabricated contouring system. We do not market the pre-fabricated system with our standard designs however, if you have a large custom design that is going to be permanent please contact us at www.ProPuttSystems.com/contact-us and we will get you pricing.
“Putt Like A Pro”